------------- ----------
 |
| Copper washes to help with preventing bolts comming loose Picture from Previa Tarago @ Tarago Previa Estima Club |
- 1994-1999 has the upgraded SADS, but what are the differences?
"get the 94 engine if you can... not only is the SADS improved (not part of the engine anyway), it has an improved PCV system, more robust oil baffles, better head gasket, among other things... " - TheMAN, http://www.toyotavantech.com/forum/showthread.php?3000-celeron55-s-Previa-adventures/page3&highlight=egr+valve+blocked
------------------ ---------------
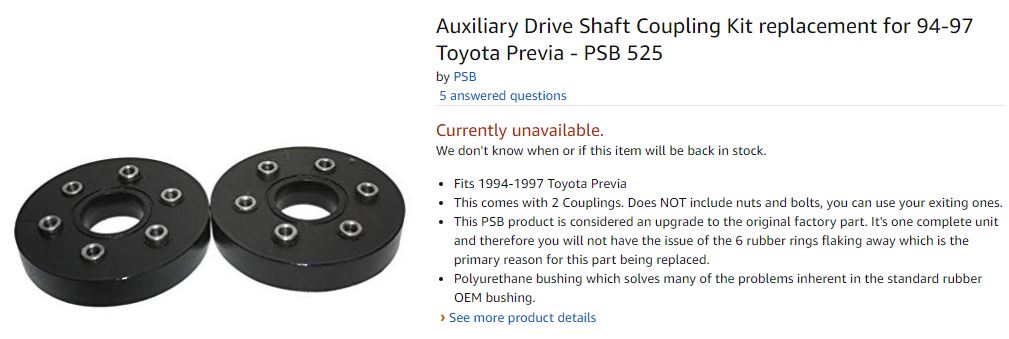
Samay Sengamphan recommends this kit
"Just picked up this set of couplers from a local dealer. If you want something as close to the original as the original :) , then these will be the closest. They are not cheap, but they will last longer than any of those after market couplers."
91-93 12mm sleeve, 94-97 14mm sleeves.
These are for 95, 14mm collar.


------------ Check out Samay do it -----

Separated Accessory Drive Shaft. S.A.D.S. [ Tarago Previa Estima TCR10 ]
Parts used in this video:
 |
| http://www.ebay.com/itm/TOYOTA-TARAGO-TCR10-AUX-SHAFT-COUPLING-SET-KIT-1990-2000-14MM-/322049012528?hash=item4afb9df330%3Ag%3AZY8AAOxyLNpSD1yY&vxp=mtr |
 |
| Using a magnet on the oilfilter is debateble. Usually the magnet on the oil drain plug does a better job, and wont interfere with any valve inside the oilfilter |
--------------- ----------
"Just changed the SADS! Here's my advice
Hey guys(gals if applicable)...
I just dived into the SADS bushings, and thought I'd give my advice on this monstrosity of a job. It requires alot of muscle and patience, and I can't imagine doing this job on my back using jack stands. Using a lift to get it 6 feet in the air made all difference in the world, but if you gotta do it the backyard way all I can say is I wish you best. So, using a well lit shop and a lift, and plenty of time, here's what I did that worked(I must say I prayed to my God first and he led me the right way so I don't take all the credit here:-)
1. Take off the blower cowling, the upper fan cowling, and loosen the two bolts for the radiator shroud. Also pull the big radiator hose at the top free and catch any coolant that drips. Good to be an honest and environmentally friendly mechanic.
2. Remove the fan, then the supercharger and alternator belts.
3. Remove the end shaft pulley, has four bolts can't miss it. This exposes the shaft bearing mount bolts, three of them. Go ahead and remove the upper two bolts, the lower bolt can be done from below.
4. You're done at the top, time to go below where the real fun begins.
5. . First, remove the lower of the three bearing mounts, this is what anchors it to the accessory assembly frame. At this point I went ahead and removed the bolts at the engine side coupling using a 12mm wrench and socket, just took all six out and use a big pry bar to pry it free. It's pressed in on some bushings and yanking on it won't do it. And avoid banging on the shaft at all. Any bend at the flange and you're in for some "good vibrations". Just keep prying until you manage to free it. Since you removed the forward mount bolts, it will now slide forward just enough to move it to the side. It's going to slide out to the left of the engine, that's the only route.
6. Now for the fun part. There's a horse shoe shaped mount towards the front that goes around the shaft and bolts to the chassis with a rubber mount. Remove the whole thing.
7. Now, there's another bracket right in front of this mount, three bolts. I had to remove the AC compressor(4 bolts) and slide it out of the way to access the upper bolt because the supercharger as in the way. By doing this I could get a 12mm wrench on it. No clearance for a socket and ratchet.
8. The accessory "carriage" is bolted to the frame using 2 bolts and rubber mounts at 45 degree angles on each side, to the front close to the radiator. Just look for these two bolts at an angle, those are the ones. Two each side.
9. Now, you've unbolted the entire accessory carriage and can slide it around to make clearance. Except, you have to lift up on the carriage as well so the forward shaft coupler can clear the stearing rack and supercharger housing. Many people use a strap from the top and hang it a few inches. This is recommended, but I opted for the Hercules approach and, with a 4 foot pry bar, lifted the accessory carriage up whilst pulling the shaft clear. This is where muscles are required and actually I sustained minor stress fractures which I'm used too as an aircraft mechanic anyways. Just have to play through the pain. Unless of course you were smart and hoisted it up from the top
10. Pulling the shaft out is a moment of triumph and worthy of a couple"get out you sucker!" or whatever you want to say to a shaft as stubborn as this one.
11. I took the shaft to the bench where the critical bushing change was to be done. For some reason the bushings will be seized to the flanges so you'll have to first pry the coupler free, tearing it free from the bushings which will be deteriorated enough to allow this, it's why you're changing them at all. Their weakness is your advantage.
12. Now the little bushing stems will be frozen to the shaft and at this point I just gave them a little tap to break em off. No big deal.
Your tear down is done. I won't go into detail on the rebuild because as any half way decent mechanic, or any sane human being for that matter, knows things are best reassembled exactly the way they were removed. So, put it all back together now installing the new couplers the same way the old ones came off. It is so critical you get the couplers right and bolts facing the right way because if you don't you'll be wincing in pain as you hear and feel the misaligned shaft banging around underneath the moment you turn the key. Take your time please and be the very best backyard mechanic the world has ever seen(just kidding, not really, there's always someone better than you)
When its done right, the smoothness of the engine and AC engagement while in drive will make a warm fuzzy feeling come upon you. VICTORY IS SWEET!
Have fun doing this and allow for 6 hours at least so you don't rush. Slow and steady wins the race.
Enjoy!!" - f18cmech
http://www.toyotavantech.com/forum/showthread.php?3670-Just-changed-the-SADS!-Here-s-my-advice
------------------------ Another description found on
https://forum.miata.net/vb/showthread.php?t=630410&highlight=Previa+van+Progress&page=2 -----------------
From Kurtanius21
"I finally got the SAD shaft out! What a monstrous pain!
So here's where I ended last. All of this bracket components need to come out. After reading through the book, I found out what things need to be marked for proper insertion next time around. You can see the circled bolt below.
This bolt is shown here
If you look at this picture, I have marked up the location of the bolt. As you can see, there is a slot that the bolt can travel through. I am not sure what Toyota even bothered with adjustment. Why not just make it so it's always installed correctly?
I had to continue marking up the bolts. Note that it's not the relative rotation angle of the bolt that counts, just the location in the socket. Unfortunately with this one, the pain crept beneath the washer, and distorted my outline.
But I can still make out where the washers were last.


------------------------ ----------------
"My first mechanic said to 'lever it back in', which I thought would just create the same damage.
Then I read about loosening the bolts on the main pulley wheel (up on the fan side), which allows the shaft to slide forward half an inch or more - which is enough to let the shaft swing in to the rear near the engine." - Roger P
Nice, thorough description. Can't wait to try it...LOL...thanks for taking the time to write it up...
ReplyDelete